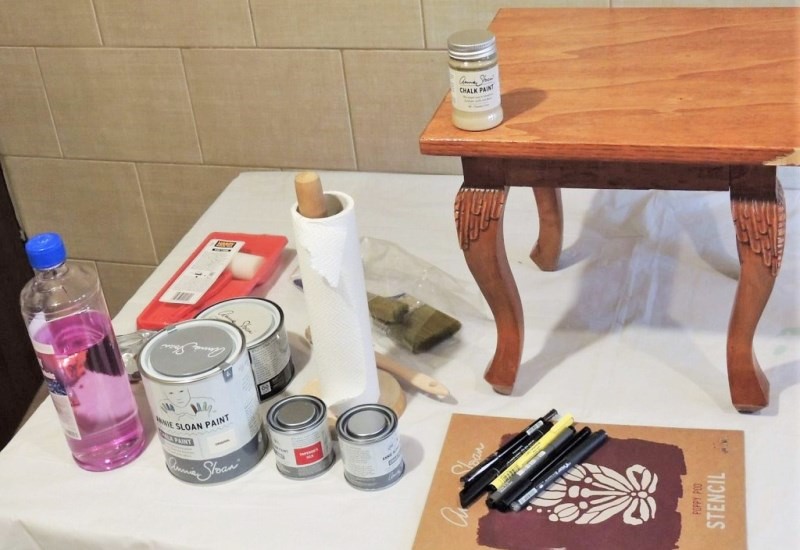
My father was a carpenter, and he had golden hands. One of the few things that he crafted for me and I still have is a small stool with curved legs. Despite its lovely appearance, I could hardly find a place for it in my home. It just didn’t fit in… It was desperately asking for a makeover, and I heard its calling. Now the little fellow fits in perfectly, because it has been painted and decorated with stencils and ink. And it was also a good opportunity to test if chalk paint goes along with ink markers. Keep reading to find out if it works!
What You Need
It may sound silly for some of you, but it was my first DIY painting project with Annie Sloan Chalk Paint. I knew how to use the paint and wax, but it was the first time I did it by myself, without any guidance from a stockist. This is an awesome product and safe for kids and pets, as it’s not toxic. You can only find this type of paint at stockist, so check this page and use your postal code to find the closest stockist.
If you are interested to replicate my project, you will need four colors of Annie Sloan Chalk Paint – Original, Emperor Silk (which is a bright shade of red), Olive (green) si Country Grey (which is actually a lovely shade of greige), clear wax, the Poppy Pod stencil, and–of course–a piece of furniture to paint on. You will also need a brush and a sponge, a bit of water (preferably bottled in a sprinkler), and black ink pens (0.5 to 0.7 width would be fine).

Before starting to paint, clean the furniture with a cloth and rubbing alcohol, to make sure that the paint will stick to the surface perfectly. I always follow this rule when painting, whatever the type of paint is.
The big challenge with this project was using an ink pen at the end, to contour the shape of the poppy. The wax used for sealing contains alcohol, which might dissolve the ink, so the natural question is, if the stenciled flower is going to bleed or not?
Let’s paint and see!
Painting the Stool
You are probably familiar with chalk paint, so I won’t go much into details about how to use it. Just apply the first coat of paint and wait 10 to 15 minutes before applying the second coat.
Take care to cover with paint all the crevasses and hidden places, and dilute the paint from time to time by sprinkling water on you recipient. Also, be aware that painting directly from the can might compromise the rest of the paint, so you’d better pour a smaller amount of paint in a different recipient, for current use.
The funny thing was that painting this stool gave me the opportunity to take a good look at the details, namely the angel wings that were embracing the upper side of the legs. Watching them closely reminded me of all the wooden sculptures that my father crafted and gifted the people around. And suddenly I felt that those wings had to be more visible, so I took the sponge and added some accent color on them. It was a great idea, as the Country Grey looks awesome on Original white. The poppy stencil would later fit in perfectly…
About Stenciling
The Poppy Pod stencil has a great design, which allows using multiple colors on the same sheet. Place the stencil on the painted (and completely dried) surface and fix it at the corners, to prevent it from slipping aside. Then paint it color by color to get the desired combination.
The Challenge of Ink Drawing
I was really anxious about ink drawing on chalk paint. I had a bit of chills about it, since this stool is so dear to me, then I said to myself “what the heck?! I will just cover it with white paint if it won’t work!”.
In the end, there is nothing shameful to cover, as the result is totally positive! No bleeding, no blending colors and a perfect thin contour that highlights the wild flower. I even added some details to make the flower look more natural.
The Final Touch of Sealing
The last thing to do is sealing the paint with a coat of clear wax. Use a cloth or a brush to apply the was then wipe out the exces with a cloth. Let it dry then bluff to make it shine.


All these steps are also depicted in the following video. Please feel free to share it with your friend, sthen give it a like and subscribe for more tutorials like this:
I am really happy that this stool that my dad made for me more than 10 years ago looks like new again. I know my father would have loved it and more, he would be proud to see how I painted and stenciled it by myself.

I’m using this small piece of furniture again, and keep it in my family room, in the center of my house, as a small reminder of my father who was a carpenter. Because, daddy, you are missed!


OMW Gabi, your father was incredibly talented. The detail on the legs are just gorgeous. You did such a lovely job honoring his hard work. It looks amazing. I’ll have to try using ink and chalk together. Such a wonderful combination
My father was a wonderful person and a great parent. I hope I will be able to honor his memory enough.
Yes, you should try this combination, as there are a lot of possibilities to use it.
What a sweet stool How special you have something made by your father. It turned out so lovely.
I am happy I have managed to accomplish this task. Thank you.