
Here comes THAT time of the year: Christmas! I know, we still have almost a month for preparations, but the joy is already here. The big tree, the sparkly decorations, and a bunch of presents to give to all the people that mean something for you and make your life worth living… I just love Christmas!
If you have a big family, then here comes the problem too, and I’m not talking about your car’s trunk being too small for all you have to buy for Christmas. What I’m saying is, that you might mix up the presents unless they are properly labeled. Just imagine: how would your grandpa look if wearing the false eyelashes that you intended to give to your sister? You might be laughing right now, but would your sister be happy with the new hearing device that was not meant for her??
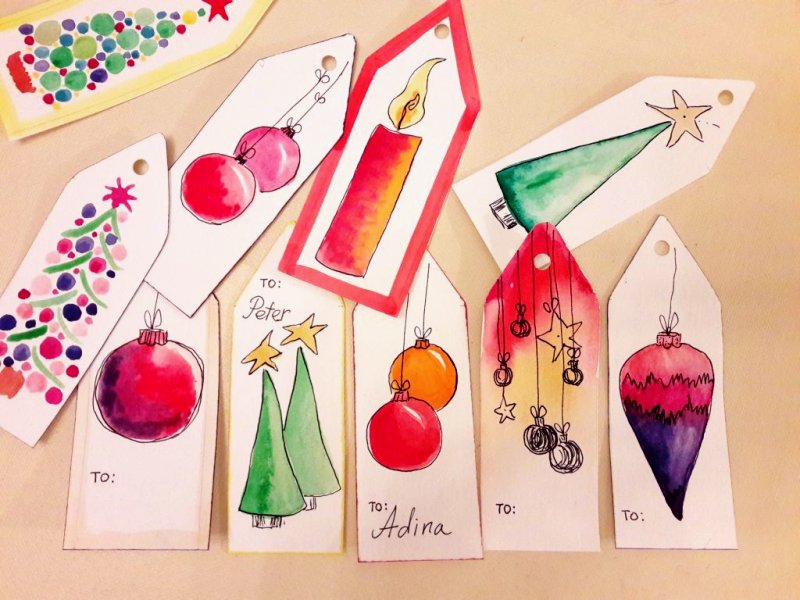
That’s why you need gift tags. And not any gift tag, but this kind of lovely colored handmade gift tags that I have designed and painted by myself, and you can easily replicate in a couple of hours.

Let’s Start…
…with a piece of thick paper 8.5-in x 11-in, a small brush, watercolors, a ruler, a pencil and scissors. Use the pencil and the ruler to draw 12 equal areas on the paper, with 0.4-in between them. For each tag, draw an angle pointing to the center of the paper. Those 12 areas would later turn into tags, so you have to draw something on each of them. Choose naive art like Christmas trees, stars or simple decorations.

Fill all the areas with designs at your will. Play with colors and shapes, add small details with an ink pen, or you could even add a pinch of sparkle or fluff with beads, pompoms or anything else you like. I decided to stick with watercolor and ink, as this is my favorite painting technique.

Let the tags dry, then cut them one by one. You’ll get 12 personalized gift tags to play with a little more.
 What you need next is to make them easy to fix on the ribbon, so you need to perforate them close to the top. You can use an usual desk paper decorator for this task. It might be useful to make a small sign prior to perforating, just to make sure that the hole you’re making is centered and not too close to the top.
One more thing to do for decorating the tags would be coloring the edge with a marker, to make the contour more visible and give them a finished and neat look.


As you can see, two of them are already taken, as the gifts for two of my dearest friends – Adina and Peter – are to be sent overseas, thousand miles away, just in time for Christmas, I hope.


Painting makes me happy, and I hope you can tell that only by looking at those small pieces of art. You won’t find two of a kind there, and there’s still room for many other unique designs. Would you try to make gift tags by yourself, or you would rather get something already printed? Share your thoughts in a comment!


3 comments
What a great idea… These are just beautiful! (it’s like 2 gifts in 1) 🙂 Liz
Ahhhh Gabi, they’re so beautiful. I love, love, love the one with the stars and baubles. It looks like they’re hanging in the sunset and the way you’ve shaded the baubles from pink to purple. Just gorgeous
I love it too. It’s a simple technique behind making it and it could be used on different objects. I am happy you like these tags too.